Snowflake Cortex Agents: How to use them in Sigma


A Snowflake Cortex Agent answers plain-language questions from your Snowflake data, using the semantic views and search services your data team has already built. Sigma lets you use that same agent inside workbooks and apps. Business users can chat with it in Sigma Assistant, and builders can add it as a tool to a Sigma agent tailored to one team's workflow.
This guide covers what Sigma adds to a Cortex Agent, how access works, and the steps to connect an agent and test it. Cortex is the example throughout, but Sigma works similarly with other warehouse agents, such as Databricks Genie Agents.
Key takeaways
- Governance can live where it makes sense for your organization, and how you divide it between Snowflake semantic views, Snowflake roles, and Sigma is your design choice.
- One Cortex Agent can serve many Sigma agents. Each Sigma agent can have its own instructions, data, and actions for a specific team, so a shared semantic view can support several use cases without being rebuilt.
- A Sigma agent can act on the Cortex Agent's answer inside the workbook, for example by writing rows to an input table or notifying the people who own the follow-up. Warehouse-native analysis and workflow actions work together in one place.
- Setup takes a few grants in Snowflake, a sync in Sigma, and one tool added to a Sigma agent. A quick test then confirms how the agent routes questions, and you can adjust the instructions as your design evolves.
What Sigma adds to a Snowflake Cortex Agent
A useful Cortex Agent rests on work your data team has already done. The team defines metrics in semantic views, indexes documents for search, writes tool descriptions, and sets the grants that decide who sees what. That investment pays off when people across the business can use the agent. The finance manager, revenue operations (RevOps) lead, or customer success manager who needs an answer usually doesn't work in Snowflake.
Sigma gives those people a place to use it. A Cortex Agent can be added to a Sigma agent and used in the workbooks and apps where teams already work with live warehouse data, so the data team's semantic views and grants carry through without being rebuilt. Sigma adds its own instructions, permissions, and audit around the agent, and how you divide governance between Snowflake and Sigma is up to you.
It all happens in an interface that business and technical users can work in side by side, so the finance manager, RevOps lead, or customer success manager can ask questions of the agent without needing Snowflake access.
Snowflake governs the data, and Sigma shapes the experience
Snowflake stays in charge of what the agent knows and what data it can read, through the semantic view and roles. In Sigma, a builder adds the Cortex Agent to a Sigma agent inside a workbook, then gives that Sigma agent its own instructions, data sources, and actions.
Sigma agents let one Cortex Agent serve many teams. A renewals workbook can have an agent that focuses on at-risk accounts and answers in short summaries. A finance planning app can use the same Cortex Agent behind an agent that explains variances line by line. Metrics, relationships, search services, and grants stay defined once in Snowflake, so the data team maintains a single source of truth while app builders decide how each Sigma agent behaves.
Answers turn into action in the same workbook
A Sigma agent can combine the Cortex Agent's answer with data already in the workbook, then run the actions a builder has configured. For example, a RevOps manager asks her workbook's Sigma agent why renewals slipped in one region. The Sigma agent calls a Cortex Agent set up with renewal metrics and indexed call transcripts. The answer names the at-risk accounts and the reason behind each one. When she asks the agent to follow up, it writes those accounts to an input table and notifies the customer success managers who own them. The question, the answer, and the follow-up all happen in one workbook.
You choose which warehouse agent fits each use case
Sigma connects to warehouse agents through the same tool picker, whether the agent is a Snowflake Cortex Agent or a Databricks Genie Agent. That flexibility matters for teams that run more than one data platform. They can pick the agent that fits each workflow, and swap it later by changing the Sigma agent's tool and instructions instead of rebuilding the app. Sigma's help docs keep a current list of supported agents.
How access works when Sigma calls a Cortex Agent
Sigma works with the access controls you already have. If your Snowflake roles and row access policies already define who sees what, the Cortex Agent can use them directly instead of recreating that logic in Sigma. Sigma adds its own permissions on top, and you can enforce more granular rules in Sigma where that fits your design. That flexibility means you can start with the controls your data team has already built and add Sigma-side rules only where a team needs them.
A Cortex Agent queries Snowflake directly, so Snowflake's roles and policies decide what it can read. Access to the Cortex Agent follows how your Sigma connection authenticates. With OAuth, each user's own Snowflake role applies. With key-pair authentication, the connection's role applies and a Sigma admin grants users or teams access to the agent. We cover both setups later in the next section.
Sigma adds its own controls on top. Admins can turn warehouse agents on or off for Sigma Assistant, and builders decide what each Sigma agent can reach and do.
How to connect a Snowflake Cortex Agent to Sigma
The steps below follow the Cortex specialist QuickStart, and the screenshots come from it. They assume you have access to a Snowflake account where you can create a semantic view and an agent. A trial account works for testing. For the sample data and full SQL scripts, follow the Cortex specialist QuickStart.
1. Create the semantic view and Cortex Agent in Snowflake
A Cortex Agent needs two layers underneath it: a data layer and a semantic layer on top. In the QuickStart, the data layer is a SQL view that joins Snowflake's sample ORDERS and LINEITEM tables. The semantic layer maps those columns to business terms, defines metrics and joins once, and exposes only the columns you approve.
In Snowsight, create the semantic view under AI & ML, then Cortex AI, then Analyst. Keep the options to add sample values and descriptions, then confirm the view works by asking the Playground to explain the dataset.
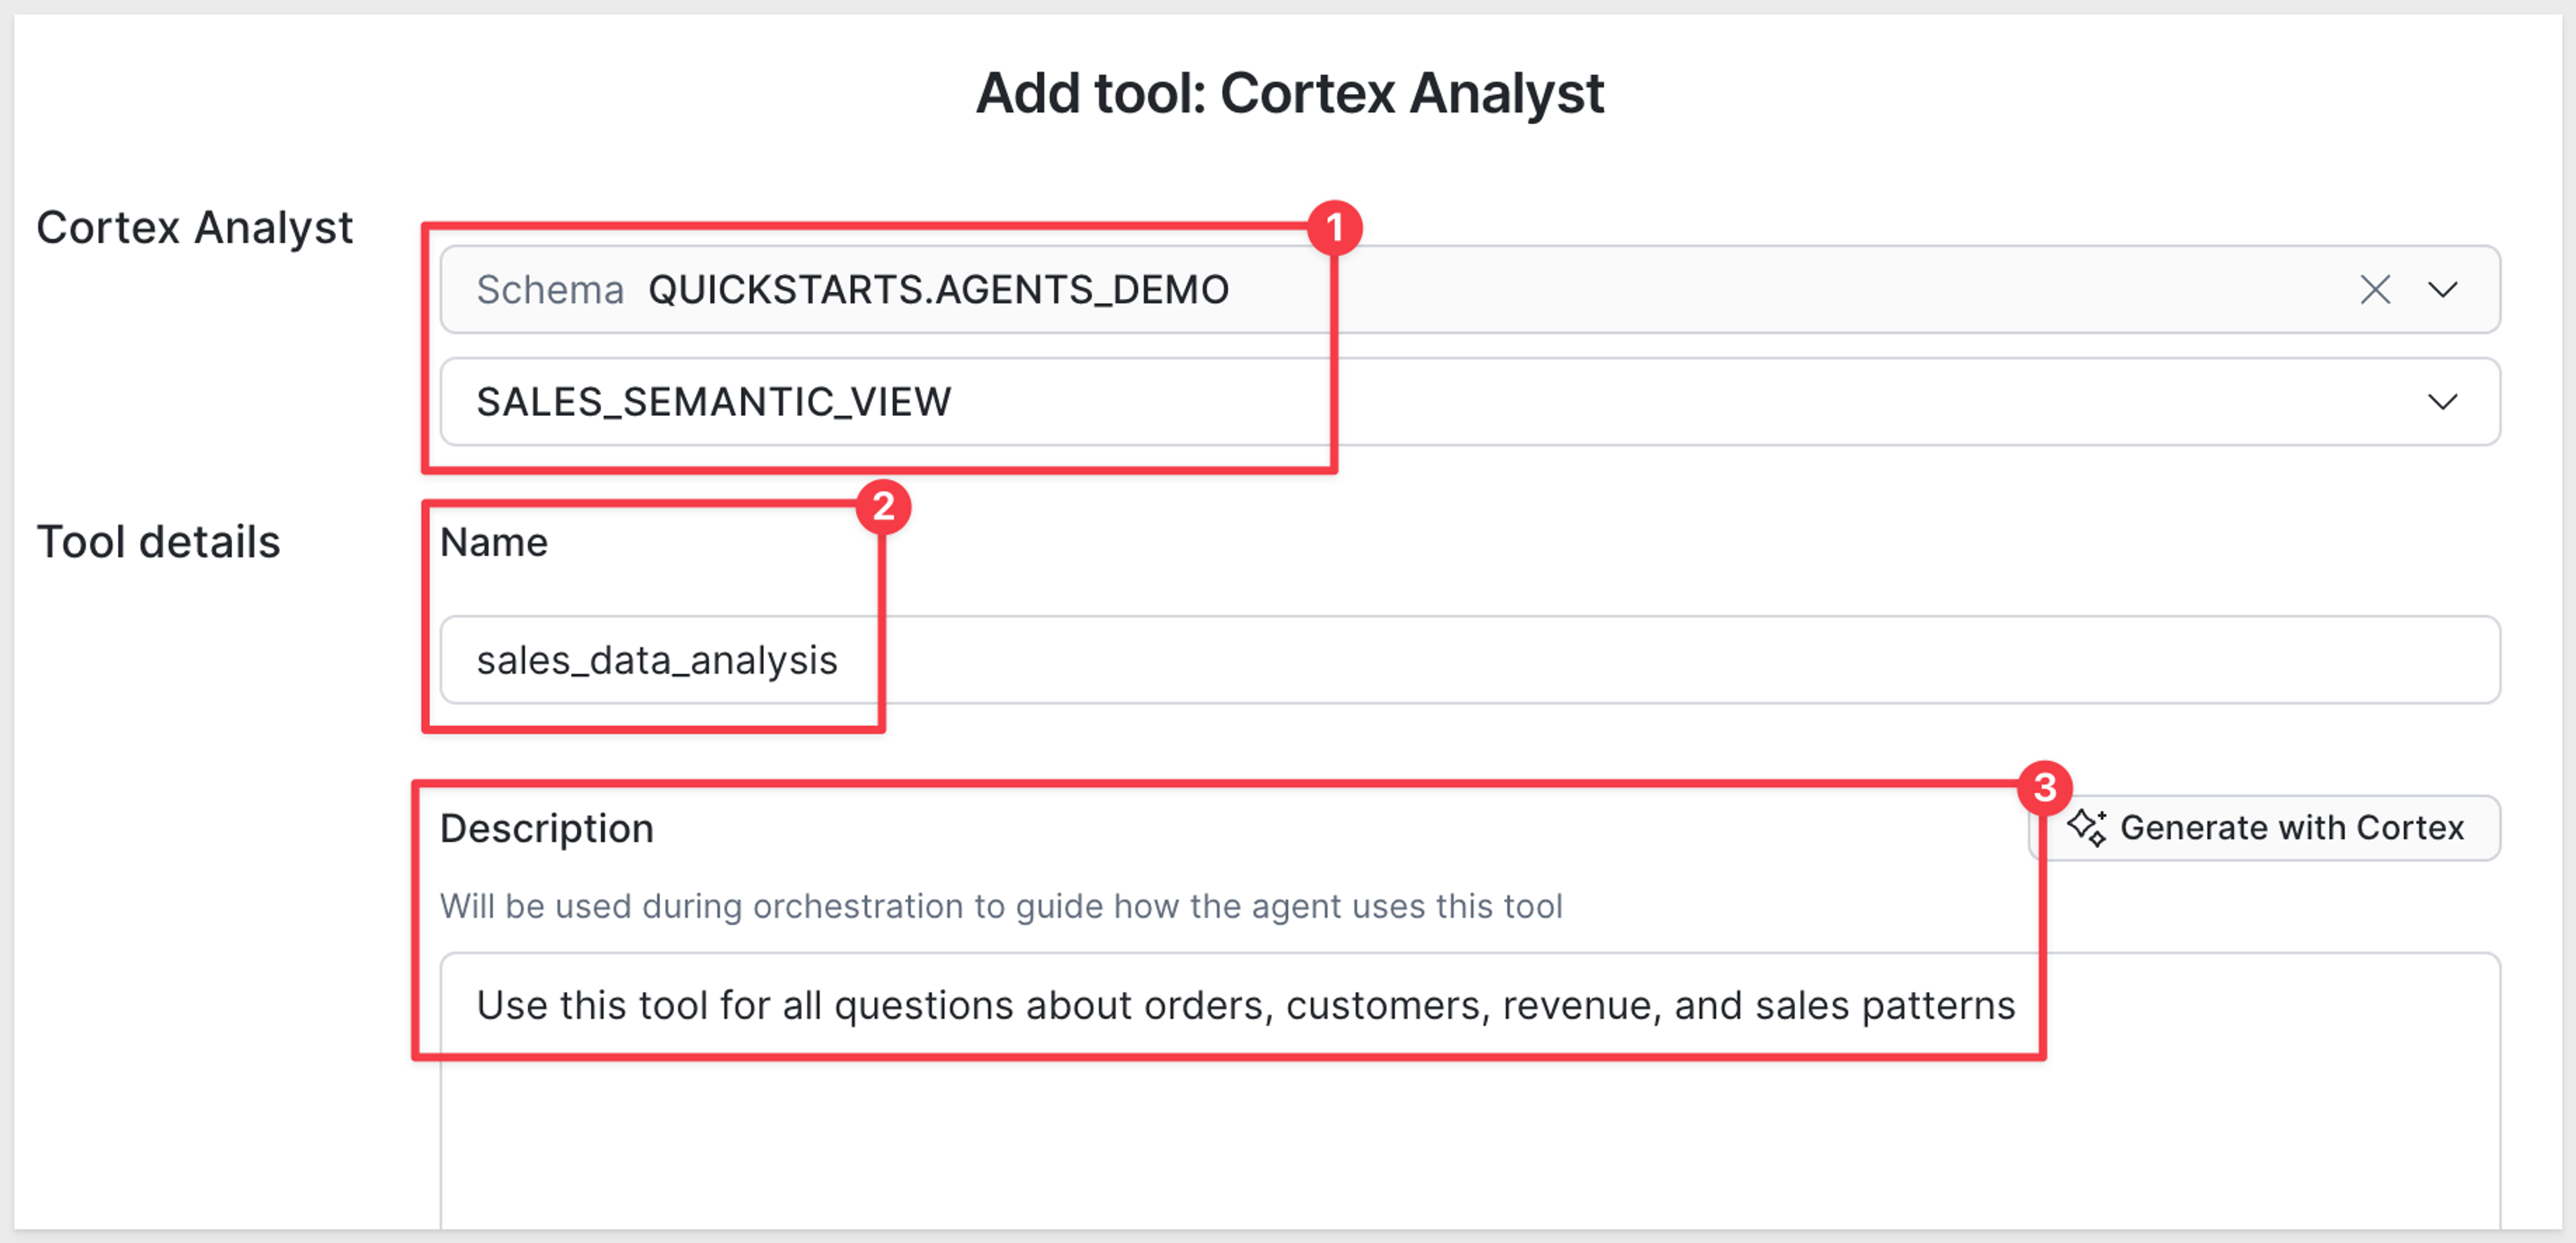
Next, create the agent in Agent Studio. Under Configuration, then Tools, add the semantic view as a Cortex Analyst tool. Give the tool a specific name and description, because the agent reads the description to decide when to call it. Then add instructions that tell the agent to use that tool for questions about orders, customers, revenue, and sales, and save.
In Agent Studio, the Cortex Analyst tool points at the semantic view and carries the description the agent reads when deciding whether to call it. The screenshot below shows the QuickStart's tool, which pairs SALES_SEMANTIC_VIEW with the description “Use this tool for all questions about orders, customers, revenue, and sales patterns.”
2. Grant Sigma's Snowflake role access to the agent
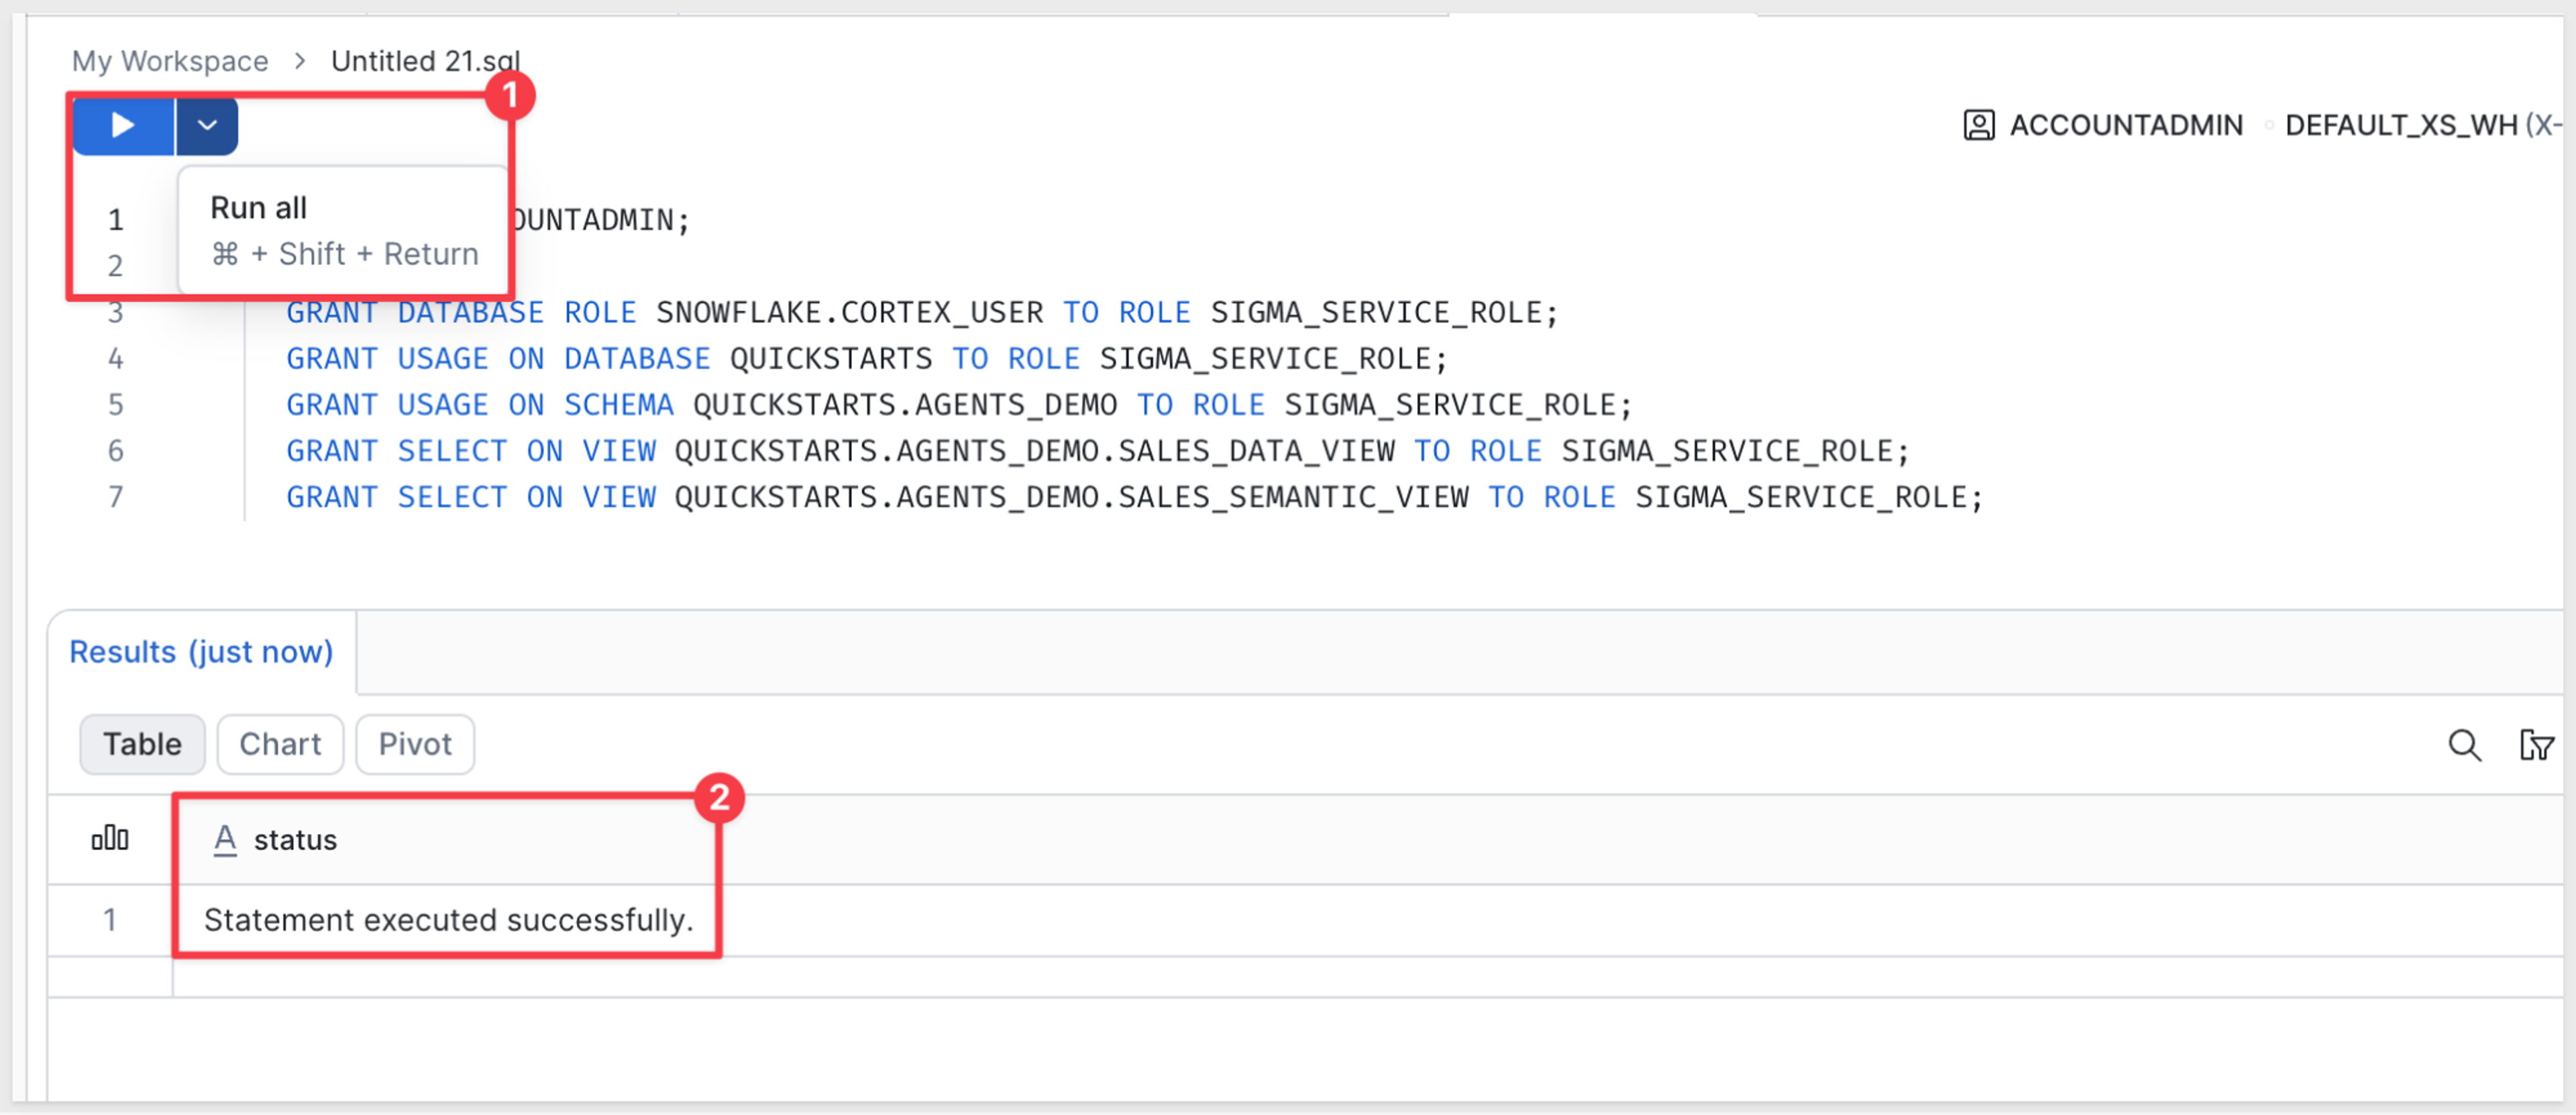
Sigma reaches the agent through the role on your connection, so that role needs access to the agent and to everything the agent reads. You can find the role in Sigma under Administration, then Connections. With OAuth, the grants go to each user's role. The role needs five grants:
- Grant the
SNOWFLAKE.CORTEX_USERorSNOWFLAKE.CORTEX_AGENT_USERdatabase role. - Grant
USAGEon the database and schema that hold the agent and semantic view. - Grant
SELECTon the underlying view or tables. - Grant
SELECTon the semantic view. - Grant
USAGEon the agent itself. The SQL grants above don't cover this one, so open the agent's Access tab in Agent Studio, add the role withUSAGE, and publish the agent.
The screenshot below shows the QuickStart's grant script running for the Sigma connection's role. It grants the CORTEX_USER database role, USAGE on the database and schema, and SELECT on the underlying view and the semantic view, and the statement completes successfully.
A missing grant shows up as an error saying an object doesn't exist or isn't authorized. It can surface at question time instead of setup, because Cortex Analyst generates SQL against the underlying view only when a question needs it. Check this list first if the agent fails.
3. Enable Cortex in Sigma
Sigma needs three things before a workbook can reach the agent: an AI provider, a sync, and access.
First, an admin opens Administration, then AI settings, then General AI, and sets the provider hosting to a data warehouse hosted model on the Snowflake connection that holds the agent. A provider pointed at a different connection can't reach the agent.
Second, sync the Snowflake connection, including the database and schema that hold the agent, using More actions and then Sync now in the data catalog. Once Sigma indexes them, the agent appears in the catalog next to your tables.
Third, grant access in Sigma. Syncing makes Sigma aware of the objects, but it doesn't make them selectable, because Sigma's catalog has its own access layer on top of your Snowflake grants. In the QuickStart, an admin opens the semantic view's Access tab and selects Grant access for the team or role that should use it. On a key-pair connection, grant Can use on the agent the same way. With OAuth, Snowflake manages access to the agent.
The screenshot below shows the Access tab for the QuickStart's semantic view in Sigma's data catalog, where an admin selects Grant access and sets the access level to Can use.
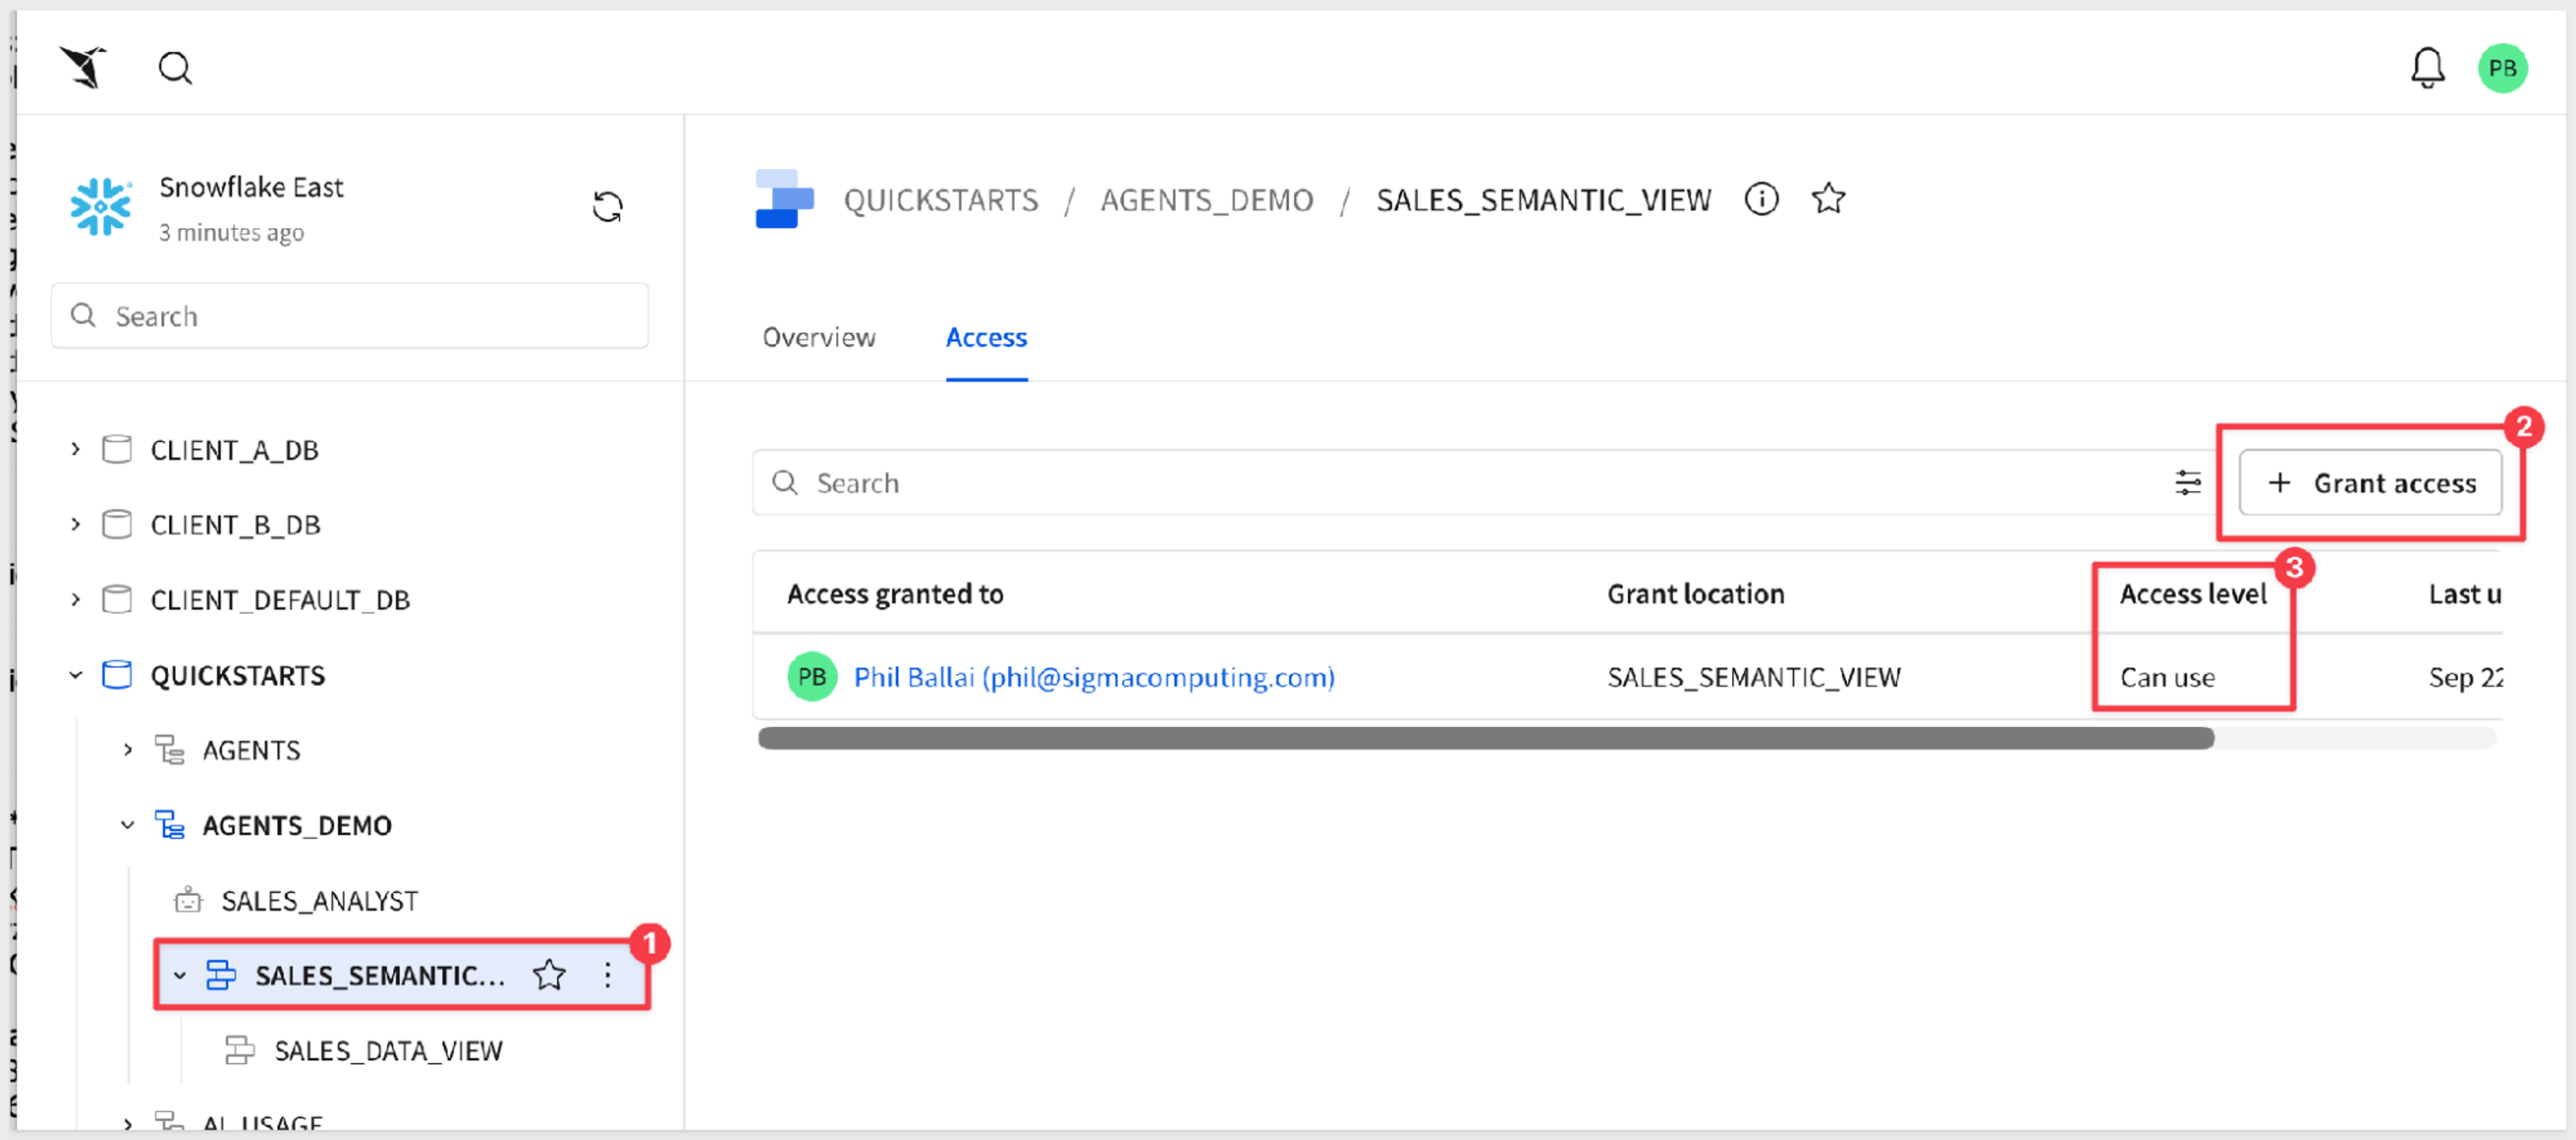
If the agent doesn't appear when you attach it in the next step, sync again and refresh the page, check whether the agent needs its own Grant access entry, and confirm the role on your connection is the same role that was granted USAGE on the agent.
4. Attach the Cortex Agent to a Sigma agent
Start with a workbook that holds the data the Sigma agent should use. The QuickStart adds the BIG_BUYS_POS table from the Sigma Sample Database as a table element. With the table not selected, open the Agents tab in the properties panel, select the plus, and name the agent. Under Data sources, add the table. Under Tools, choose Add tool, then Warehouse agent, select your Snowflake connection, and pick the Cortex Agent.
The screenshot below shows the finished setup. The Sigma agent has the BIG_BUYS_POS table as a data source and the SALES_ANALYST Cortex Agent as a tool, listed with its Snowflake connection path.
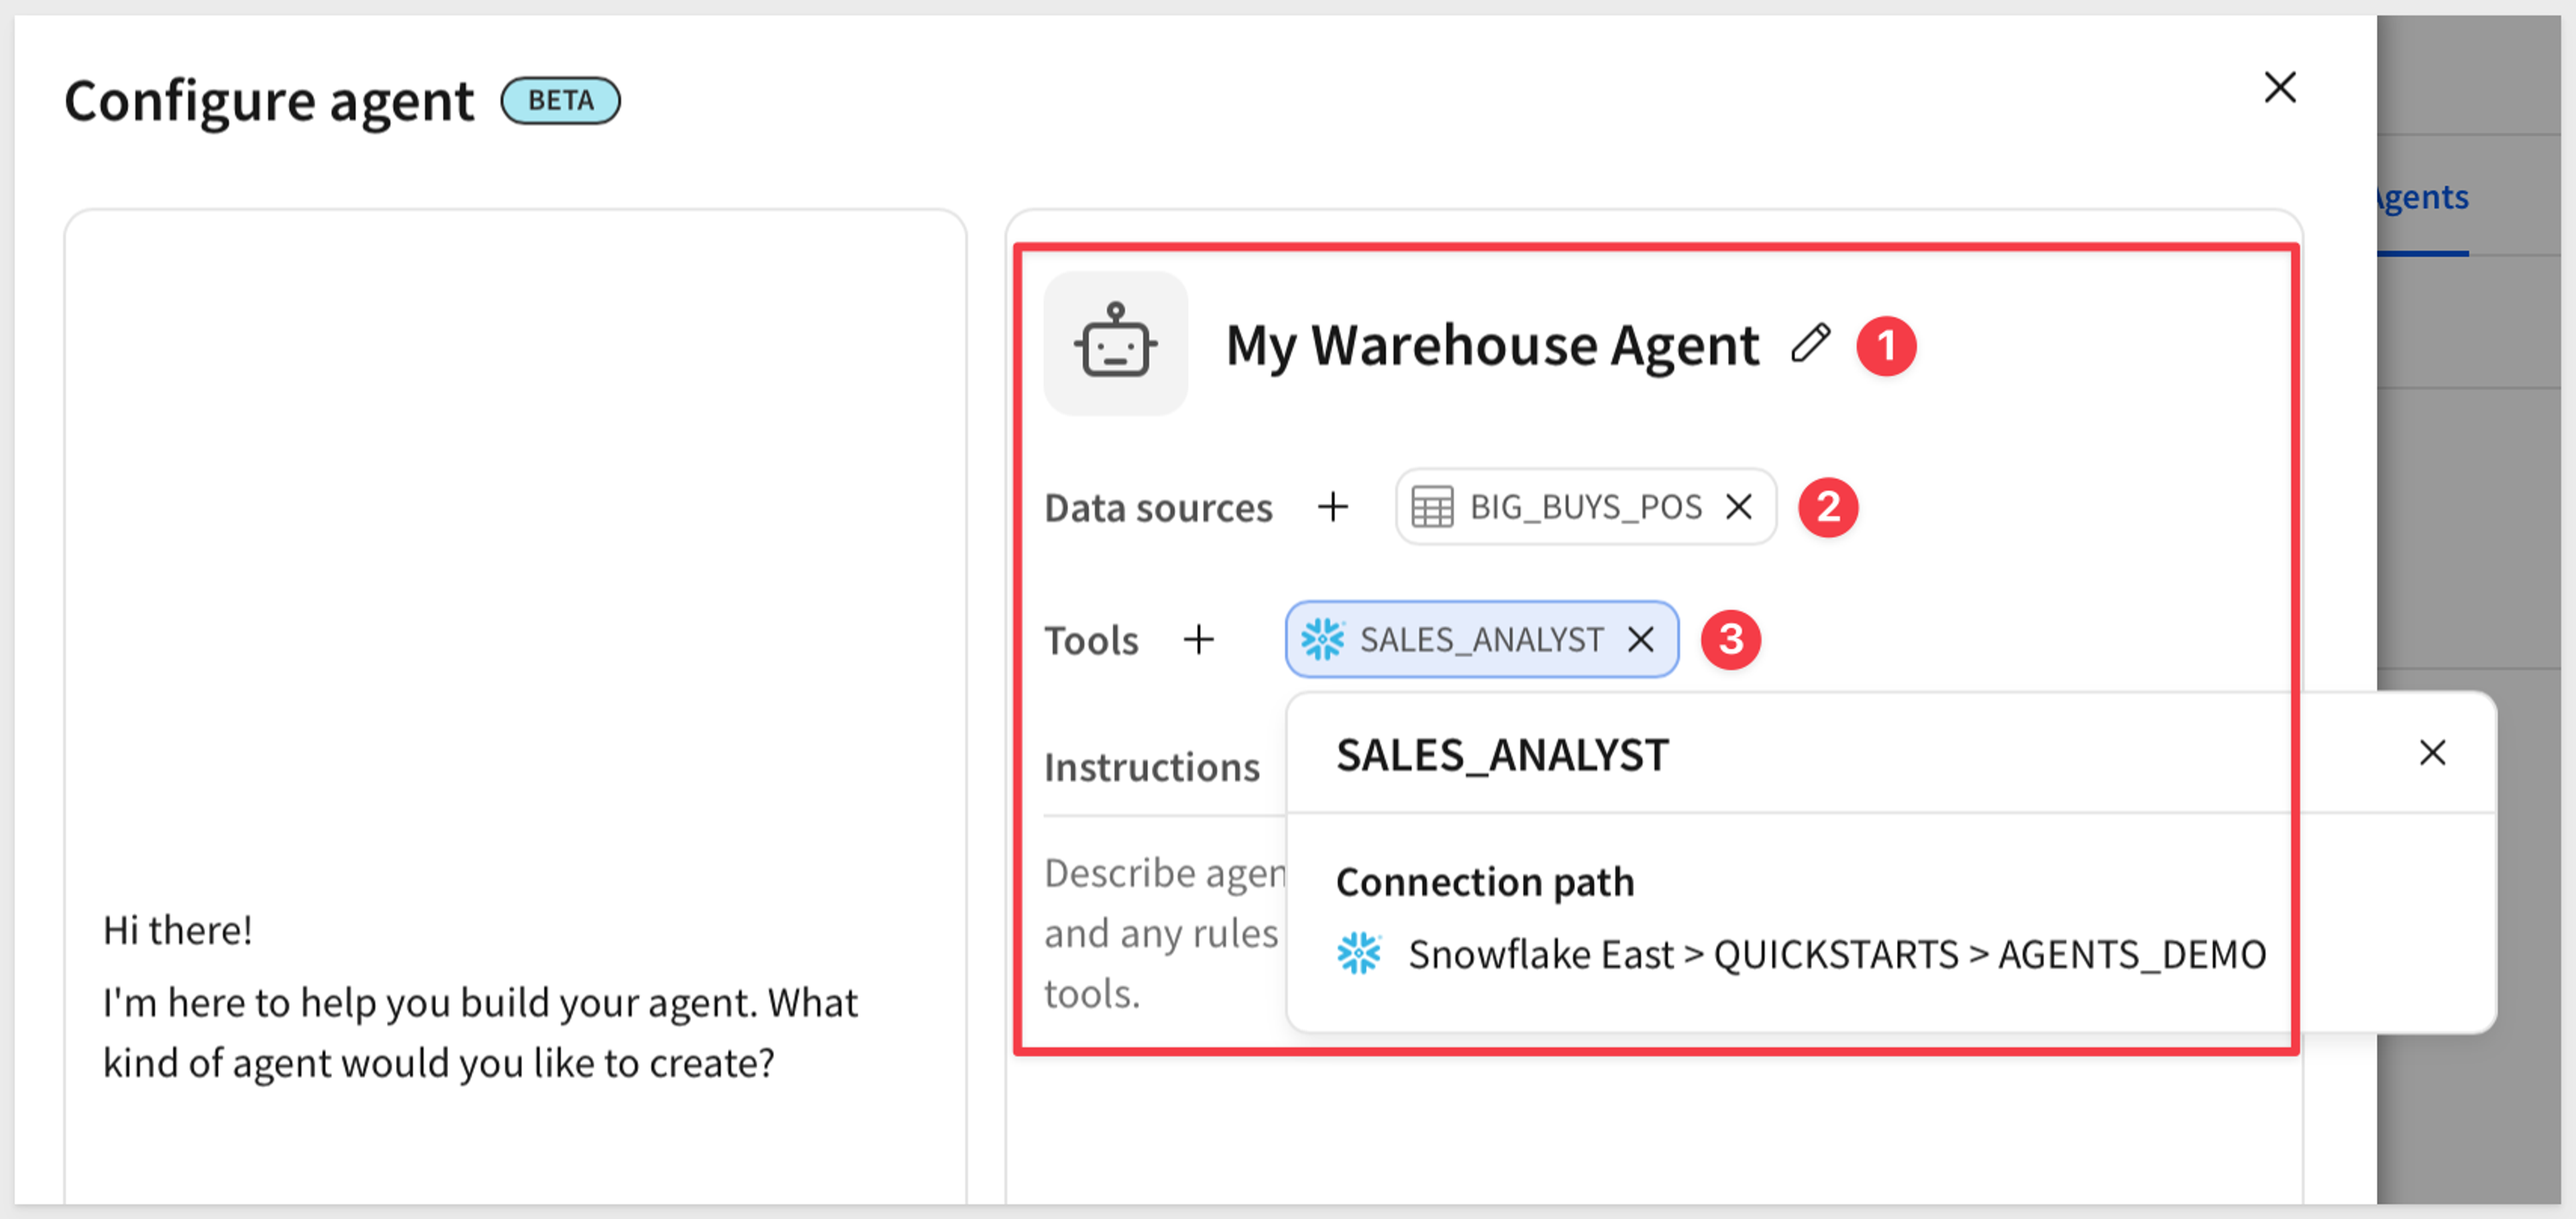
Then write instructions that name both sources. With two similarly shaped datasets, the agent can't know which to trust unless you say so. In the QuickStart, the instructions send product, region, store, and sales questions to the workbook table, and order, customer, revenue, and order priority questions to the Cortex Agent, which has its own order and customer data separate from the workbook table. They also ask the agent to say which source answered each question.
The screenshot below shows those instructions in the agent's configuration.
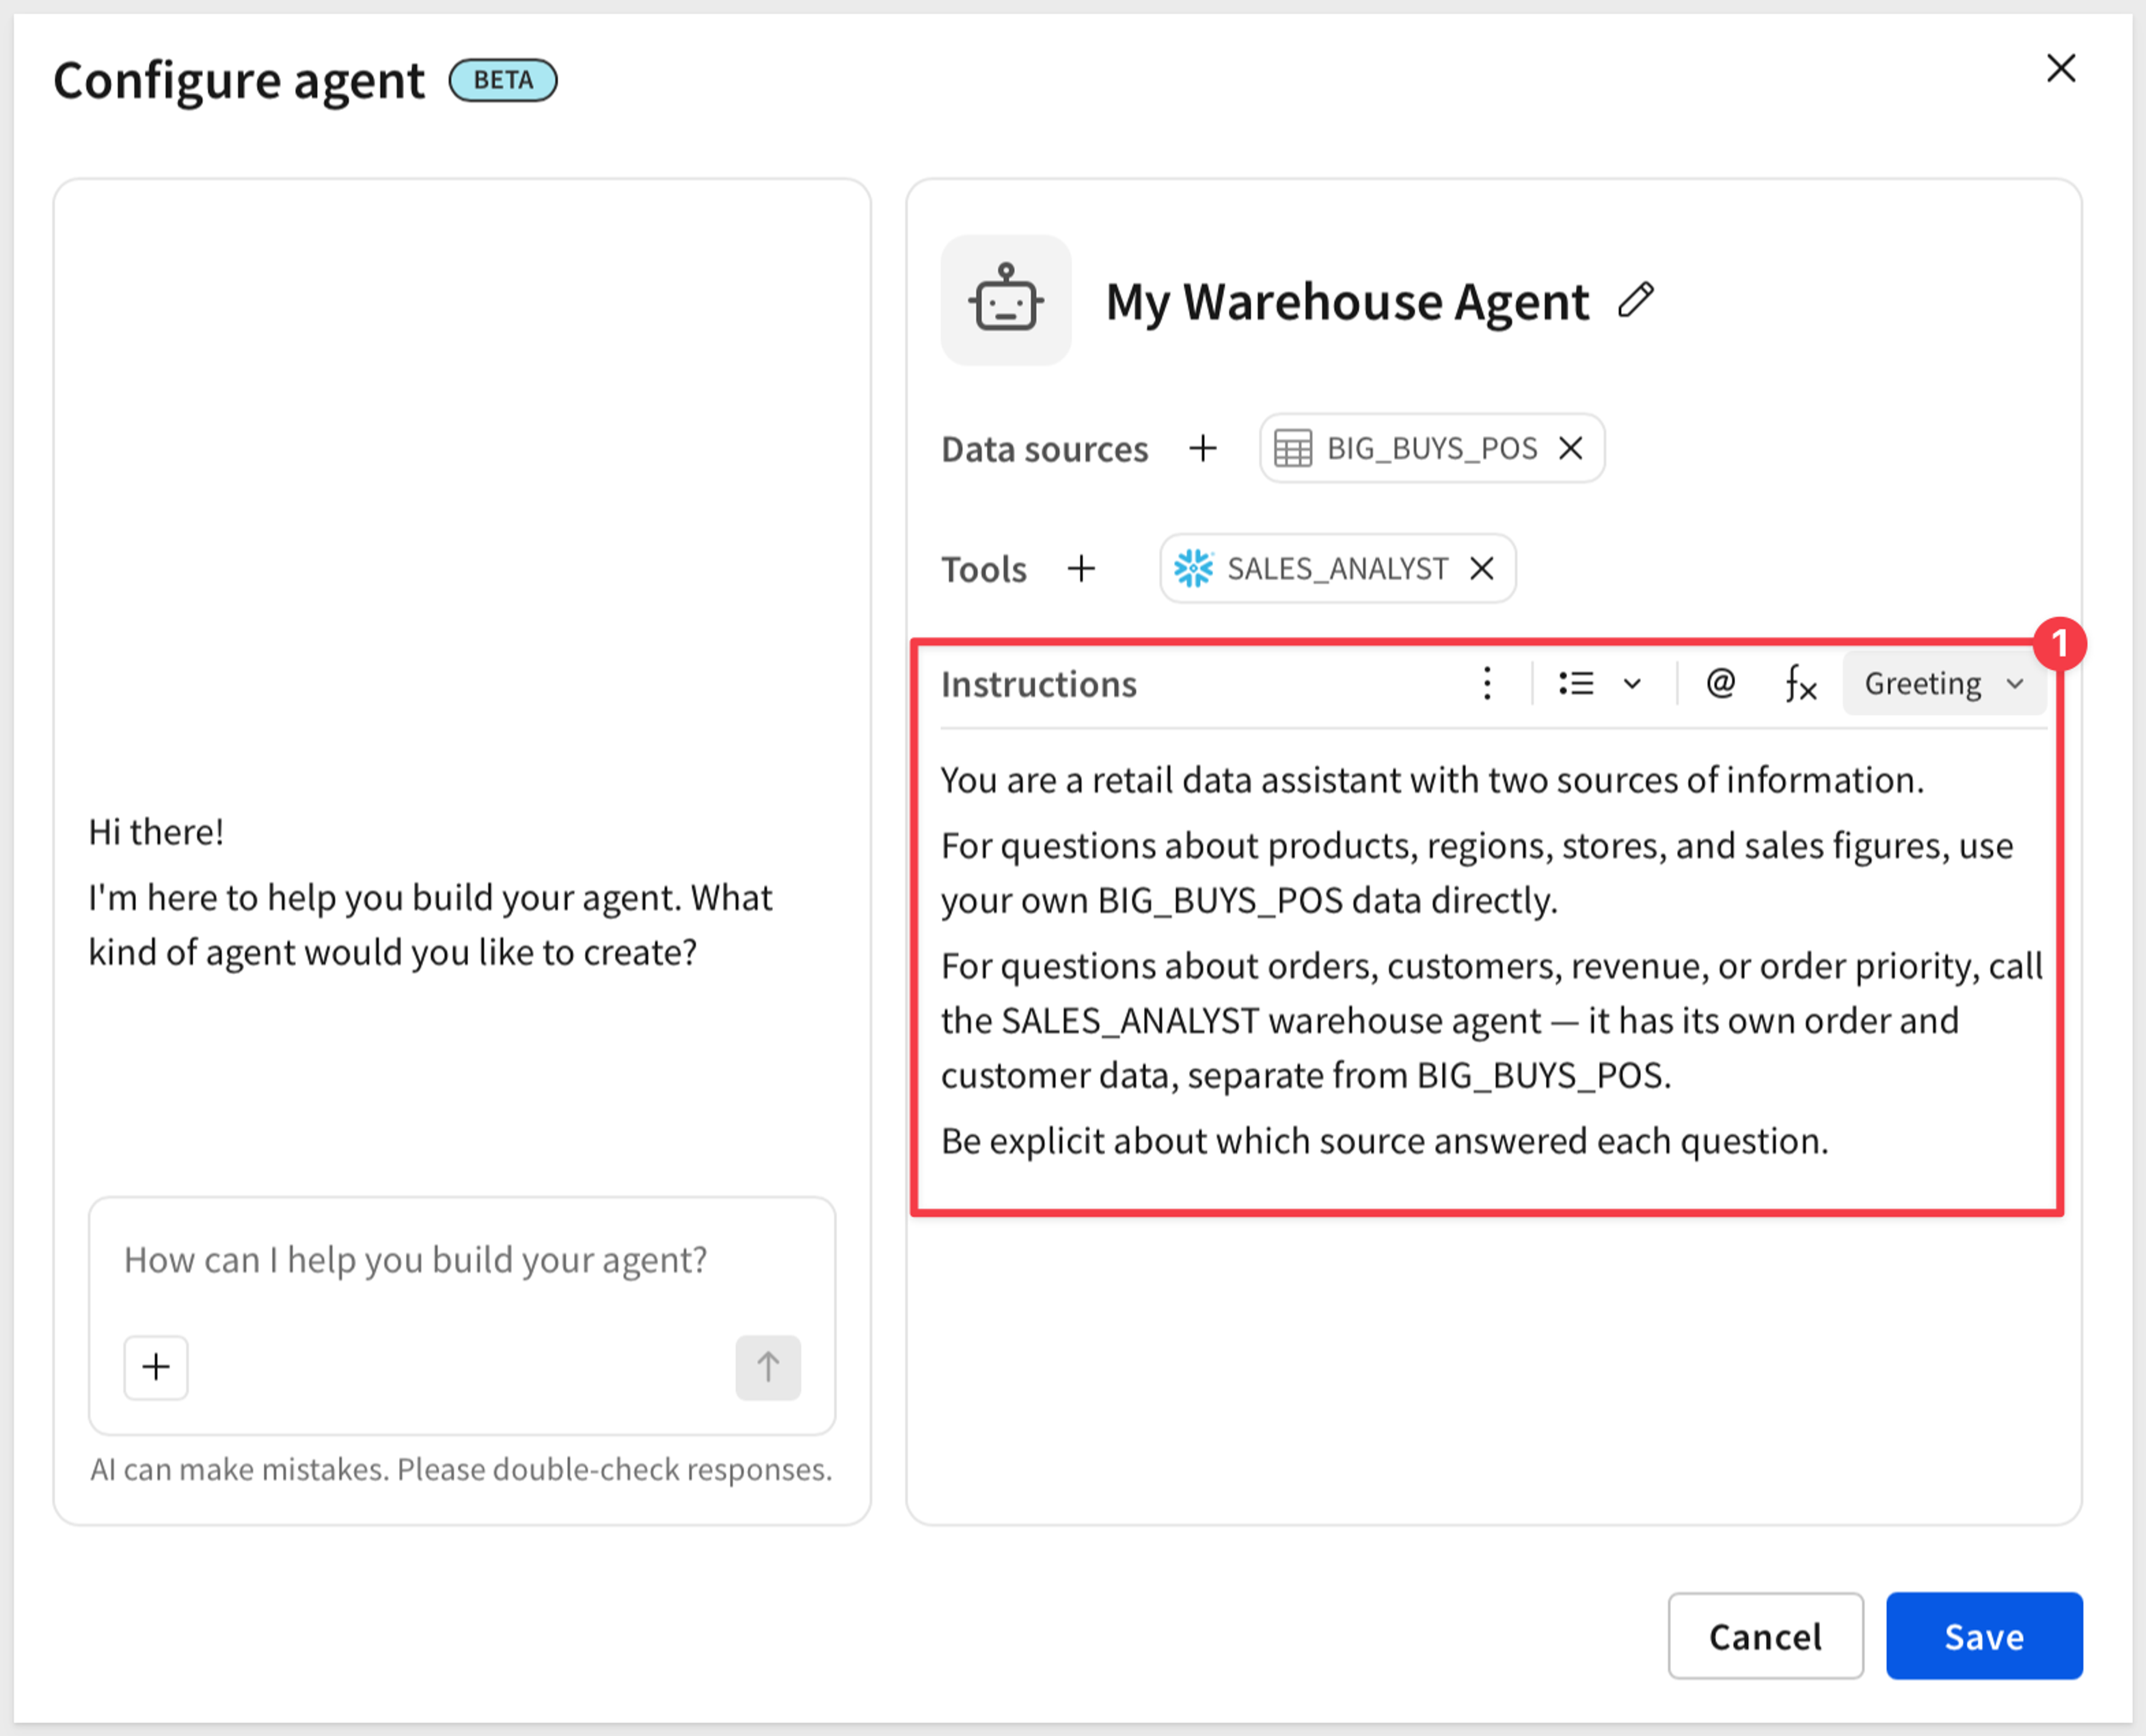
Finally, add a Chat element on its own page, connect it to the agent, and publish the workbook. To try the Cortex Agent without building a workbook, you can also start a new chat in Sigma Assistant and pick it there. Each chat uses one agent, so start a new chat to switch back to Sigma Assistant.
5. Test how the agent routes questions
Ask three kinds of questions to check that the instructions work:
- Ask something the workbook data can answer, such as “How many orders are there for the Computers product type?” The Sigma agent should answer from its own table.
- Ask something only the Cortex Agent can answer, such as “What's the total revenue by order priority?” The workbook table has no order priority, so the Sigma agent should route this to the Cortex Agent.
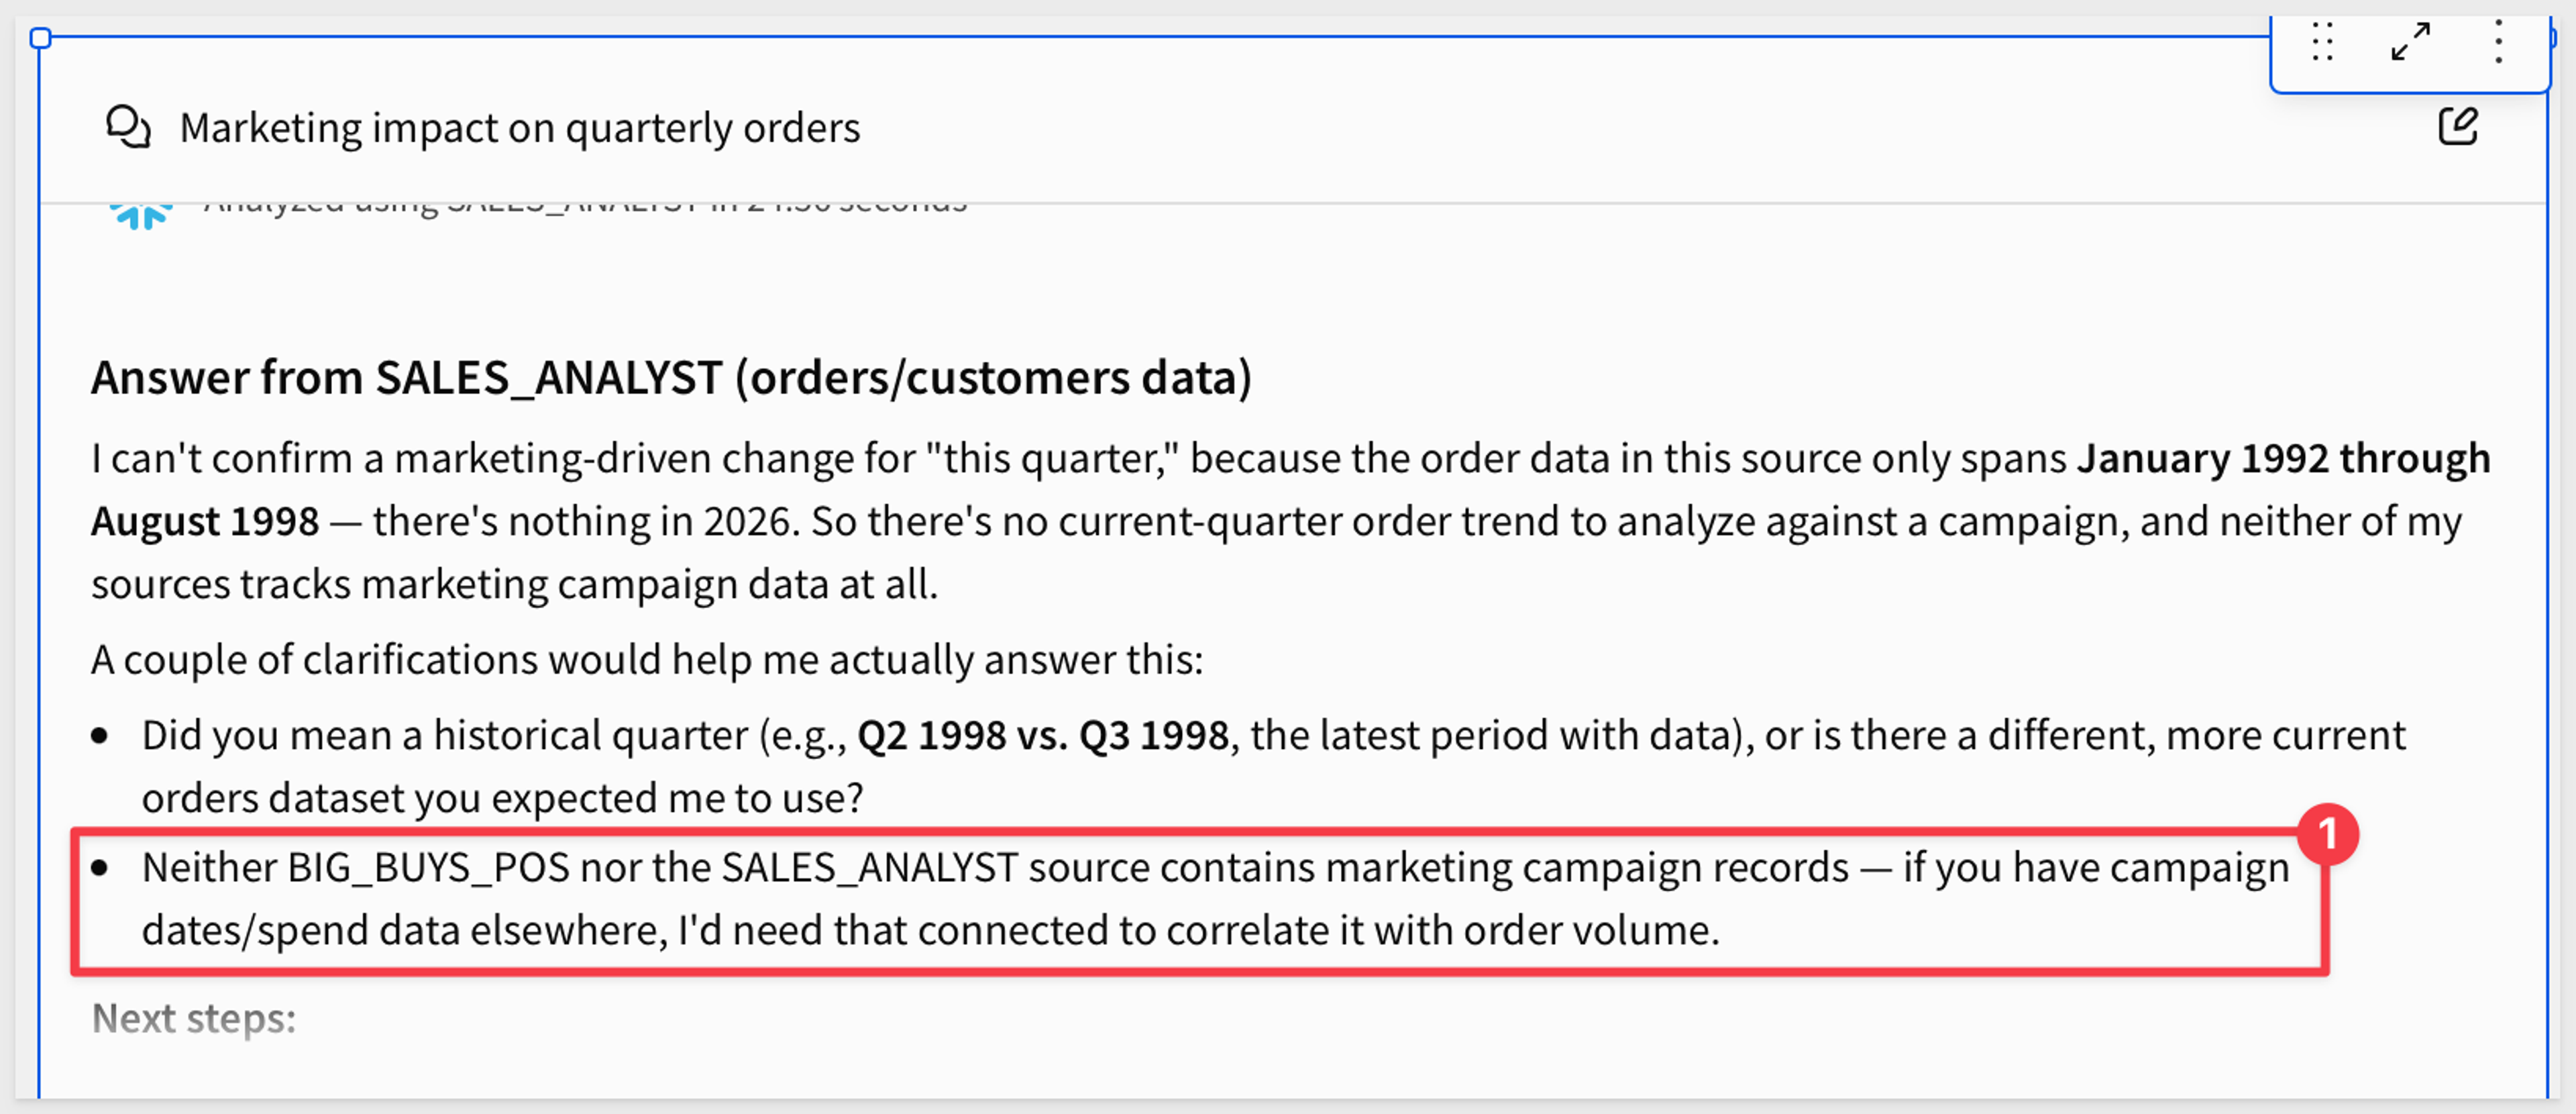
- Ask something neither source covers, such as “Did a marketing campaign drive the change in orders this quarter?” The agent should say it doesn't have that information instead of guessing.
In the QuickStart, asking for total revenue by order priority is the Cortex-only question. The workbook table has no order priority, so the Sigma agent routes the question to SALES_ANALYST. The screenshot below shows the answer: revenue by priority level, with a note that it is spread almost evenly across the levels.
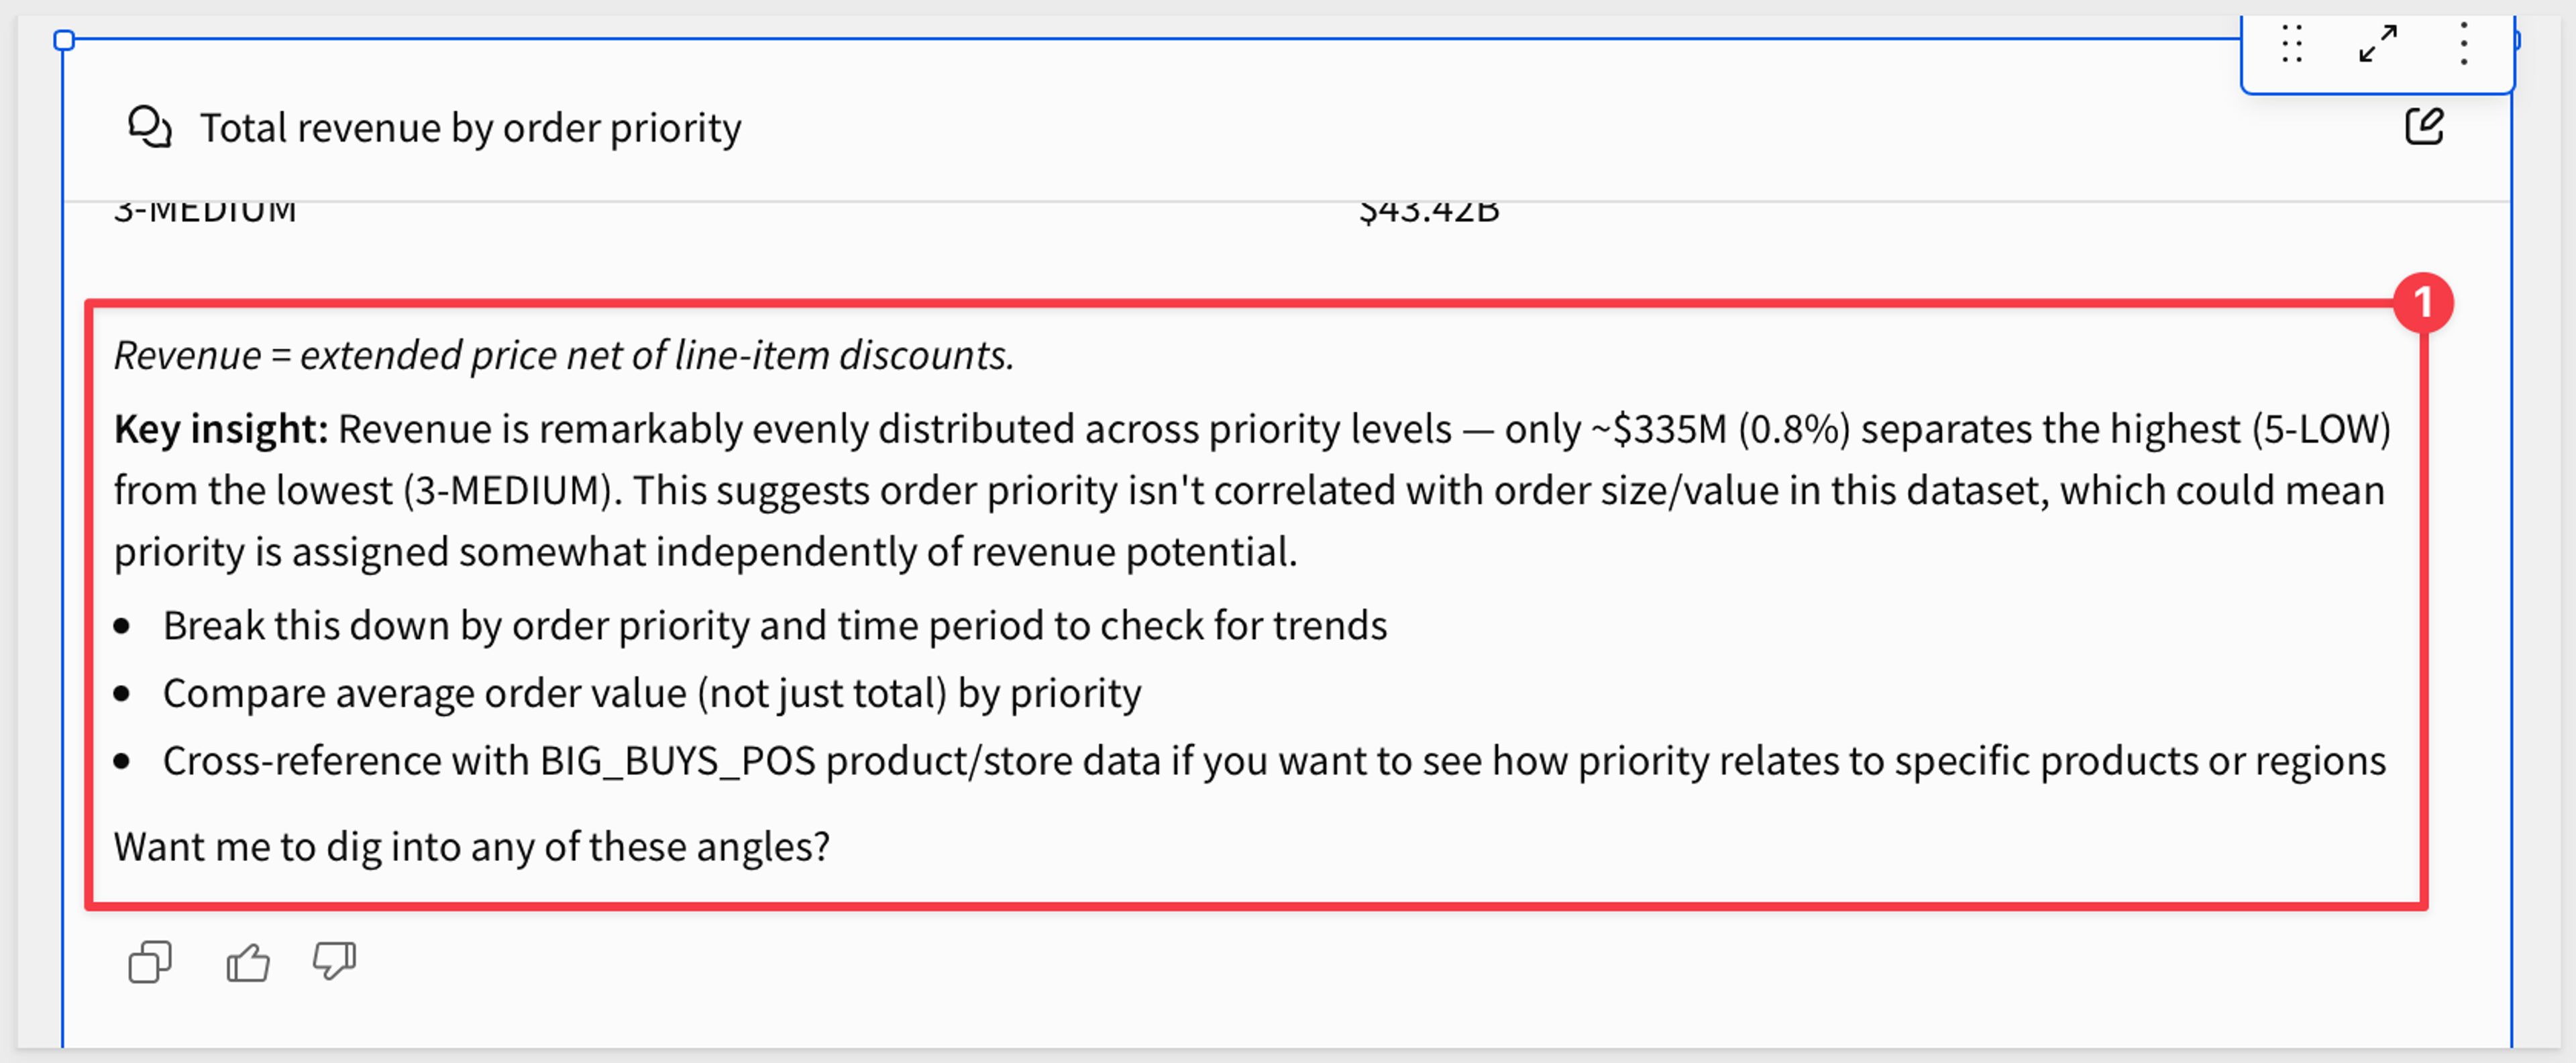
For the third question, whether a marketing campaign drove the change in orders, the agent says it can't confirm the claim. The screenshot below shows it stating that neither BIG_BUYS_POS nor SALES_ANALYST contains marketing campaign records.
If the agent answers the third question as though a source supported it, or sends the second to the wrong source, tighten the instructions so they name each source and the questions it covers.
Put your Cortex Agent to work in Sigma
Your data team built a Cortex Agent to give trusted answers from governed Snowflake data. Sigma puts it in front of the finance, RevOps, and customer success teams who rely on those answers. They get it inside the workbooks and apps where they plan and act, while Snowflake keeps governing the data underneath. The Sigma side of this setup works the same way for other warehouse agents, so it holds up as your platform choices change.
To see a Cortex Agent working inside a Sigma workbook on your own Snowflake data, request a demo.