

Want to use your Sigma dashboards outside of Sigma? Now you can bring them into your own application using Sigma embeds. Let your customers see your data just the way you would, and curate the experience based on who is viewing. Sigma's embedded analytics capabilities allow you to take your insightful reports that you built in Sigma and integrate them into your application. Sigma’s secure embedding also offers many security features as well as custom settings for how your users can interact with data in your Sigma workbooks.
Preparing the embed and client credentials in Sigma
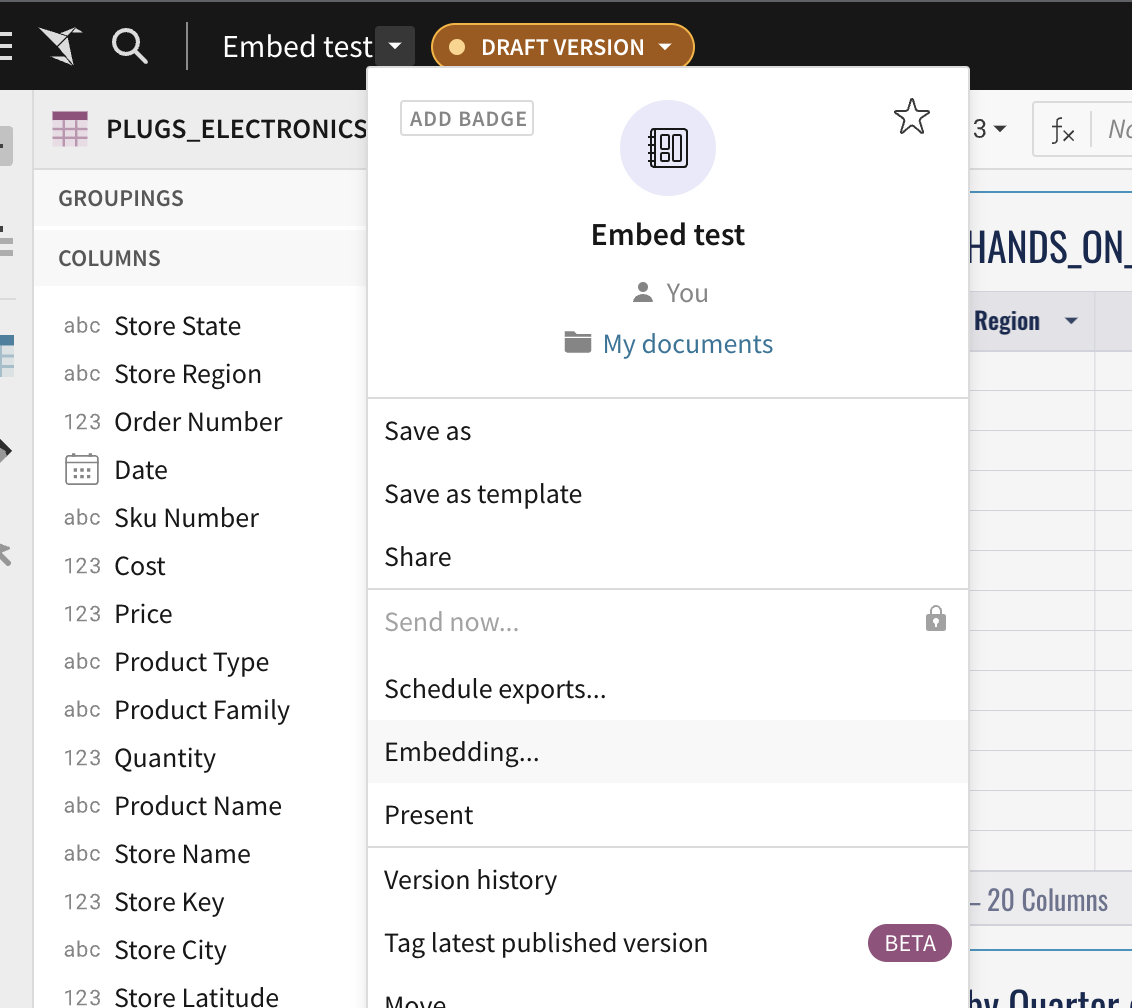
Secure embedding is a specific type of application embedding. For any application embedding, you will need to start by generating the embed in your Sigma workbook. You can find this by selecting “Embedding” in your workbook file options.
Stay on the “Application” tab and choose if you want this embed to be only a specific element, a set page, or the entire workbook. An application URL will need more set up before the embed can be displayed.
(If you would like quick and easy public embedding that allows anyone access, you can generate a public embed URL instead, read more in our documentation here: Public Embedding – Sigma Computing.
After generating the embed URL, the application embed will need a client credential. This is crucial to the security of the embed. There are two ways to create a client credential in Sigma. You can either create an embed client credential for your account, or you can create specific client credential pairs. Both are done in the Administration page, you can follow the steps here to generate a client credential: Application Embedding – Sigma Computing.
Once the client credential is safely tucked away, then the embed is ready to be implemented into your application.
Implementing the secure embed into your application
Now you’re ready to set up the embed into your own personal project. See the code snippet at the bottom for a Node.js quickstart example. There can be many different approaches for how to implement, but this section will focus on generating the server-side API that generates the embed path. The embed URL from your workbook is the core URL, and it will need parameters to be added on to define security and custom settings.
Below is the Node.js quickstart example, broken up into sections for how to create the full embed URL with parameters. The parameters are explained by the tables in each section which goes over how to use them and if they are required to be added in the final URL. Section 1 goes over how to start the application and requires an input for the embed path generated from Sigma — there are no parameters in this section. Section 2 is on parameters for security measures that are required for any application embed. Section 3 is for parameters related to user details that are required for a secure embed. The last section talks through the optional customization options that can be used to change how you show your data in the embed.
Section 1: Application set up, core URL
// SIGMA APPLICATION EMBED - APPLICATION
// SECTION 1: DO NOT CHANGE (START)


//1A: USE EXPRESS WEB NODE PACKAGE:
   var express = require('express');
   var app = express();


//1B: FETCH PATH FOR FOLDER CONTAINING HTML PAGE WE ARE EMBEDDING INTO:
   app.get('/', function(req, res) {
   res.sendFile(__dirname + '/index.html');
   });


//1C: DEFINE A ROUTE HANDLER FOR GET REQUESTS TO GIVEN URL:
   app.get('/api/foo', foo);


//1D: CALL FUNCTION AND SET REQUIRED PARAMETERS:
   function foo(req, res) {


//1E: REQUIRE NODE'S CRYPTOGRAPHIC LIBRARY:
   const crypto = require('crypto');

//1F: SET A VALUE FOR EMBED_PATH. THIS IS THE URL CREATED IN SIGMA WHEN YOU CREATE THE EMBED:
   const EMBED_PATH = 'YOUR EMBED_PATH HERE';


// END SECTION 1
Section 2: Security Measures
// SECTION 2 START: REQUIRED TO CHANGE, REPLACE VALUES WITH YOUR OWN

//2A: CREATE A NONCE (NUMBER USED ONCE) BASED ON CRYPTO'S UUID FUNCTION:
   const nonce = crypto.randomUUID();

//2B: Set searchParams = CRYPTO GENERATED NONCE GENERATED EARLIER:
   let searchParams = `?:nonce=${nonce}`;


//2C: SET A VALUE FOR SECRET. THIS IS THE SECRET CREATED IN SIGMA WHEN YOU CREATE THE EMBED SECRET:
   const EMBED_SECRET = 'YOUR API SECRET HERE';

// NOTE: FROM HERE FORWARD THE URL IS PIECE BY PIECE BY DECLARING "searchParams" AND THEN ADDING EACH ADDITIONAL PARAMETER TO IT WITH ANOTHER IN STEPS:

//2D: SET searchParams = (previous value in searchParams) + CLIENTID:
       searchParams += '&:client_id=YOUR CLIENTID HERE';

//2E: SET searchParams = (previous value in searchParams) + SESSION LENGTH:
// :session_length is defined as the number of seconds the user should be allowed to view the embed before logout
   searchParams += '&:session_length=600';

//2F: SET searchParams = (previous value in searchParams) + THE CURRENT TIME AS UNIX TIMESTAMP:
   searchParams += `&:time=${Math.floor(new Date().getTime() / 1000)}`;

// END SECTION 2
| Parameter | Required/Optional | Code Section | Description |
|---|---|---|---|
|
Required | 2A-2B | A random unique string (less than 255 characters). Sigma uses this to prevent application embed URLs from being shared and reused. |
|
Required | 2C-2D |
The embed client credential and client id. You will use the |
|
Required | 2E | The number of seconds the embed URL should remain valid after the application embed URL was generated. After the specified number of seconds, the Application Embed will no longer display new values. The maximum session length is 2592000 seconds (30 days). |
|
Required | 2F |
The current time as a UNIX timestamp. Sigma uses this in combination with the |
Section 3: User Details
//3A: SET searchParams = (previous value in searchParams) + EMBEDDING MODE:
// NOTE: This will always be "userbacked" for Embedding
   searchParams += '&:mode=userbacked';

//3B: SET searchParams = (previous value in searchParams) + EMAIL ADDRESS OF USER AUTHENTICATED BY PARENT APPLICATION. WE WILL HARD CODE THAT FOR THE LAB:
   // NOTE: For Embedding, the users should not already exist, Sigma will create them on the fly the first time.
       searchParams += '&:email=embed_viewer@sigmacomputing.com';

//3C: SET searchParams = (previous value in searchParams) + USERID OF USER AUTHENTICATED BY PARENT APPLICATION. WE WILL HARD CODE THAT TO THE EMAIL ADDRESS FOR THIS EXAMPLE:
   searchParams += '&:external_user_id=embed_viewer@sigmacomputing.com';


//3D: SET searchParams = (previous value in searchParams) + TEAM OF USER:
   // IMPORTANT: The embedded content (WB, Page or Viz) must be shared with the Team for the request to work
       searchParams += '&:external_user_team=FinanceViewers'

//3E: SET searchParams = (previous value in searchParams) + USER ACCOUNT TYPE:
   // NOTE: The account type for the calling user needs to be specified and the Account Type must exist in Sigma first
           searchParams += '&:account_type=Viewer';

// END SECTION 3
| Parameter | Required/Optional | Code Section | Description |
|---|---|---|---|
|
Required | 3A | Set this to ‘userbacked’ for secure embedding |
|
* | 3B | The email address that will be associated with the user’s account. Email addresses already associated with a standard (not embed) user account will not be considered valid. For RLS, use with CurrentUserEmail() |
|
* | 3C | User id for the user, can use the same email address as user email |
|
* | 3D | The name of your embedded users' team(s) (e.g. Team%20A%2CTeam%20B). For RLS, use with CurrentUserInTeam() |
|
* | 3E | By default, all embed users are granted Explorer permissions. Users can also be assigned creator permissions or a custom account type. Format lowercase (e.g. "explorer", "creator") |
|
Optional | N/A |
A user attribute |
*Required and only used when the mode is set to ‘userbacked’
Other Custom Settings
| Parameter | Required/Optional | Code Section | Description |
|---|---|---|---|
|
Optional | N/A | The id and value of any existing workbook control you want to pass through to the workbook. You may pass multiple control ids and values. This will allow you to customize what your viewers see |
|
Optional | N/A | Set to false to hide underlying data from embed users with explore access |
|
Optional | N/A | Defaults to true, when set to false will hide the file explorer, workbook page tabs, and "Save As" / "Edit" options |
Other Secure Embed Resources
To get started, we recommend starting a new Node.js web application with step by step instructions on how to set up a secure embed. Follow the Quickstart track here.
To go through Sigma’s official documentation on secure embeds go here.
Sign up here to read Sigma’s whitepaper that goes over secure embedding in depth.


